 English
Author: Site Editor Publish Time: 2026-06-16 Origin: Site


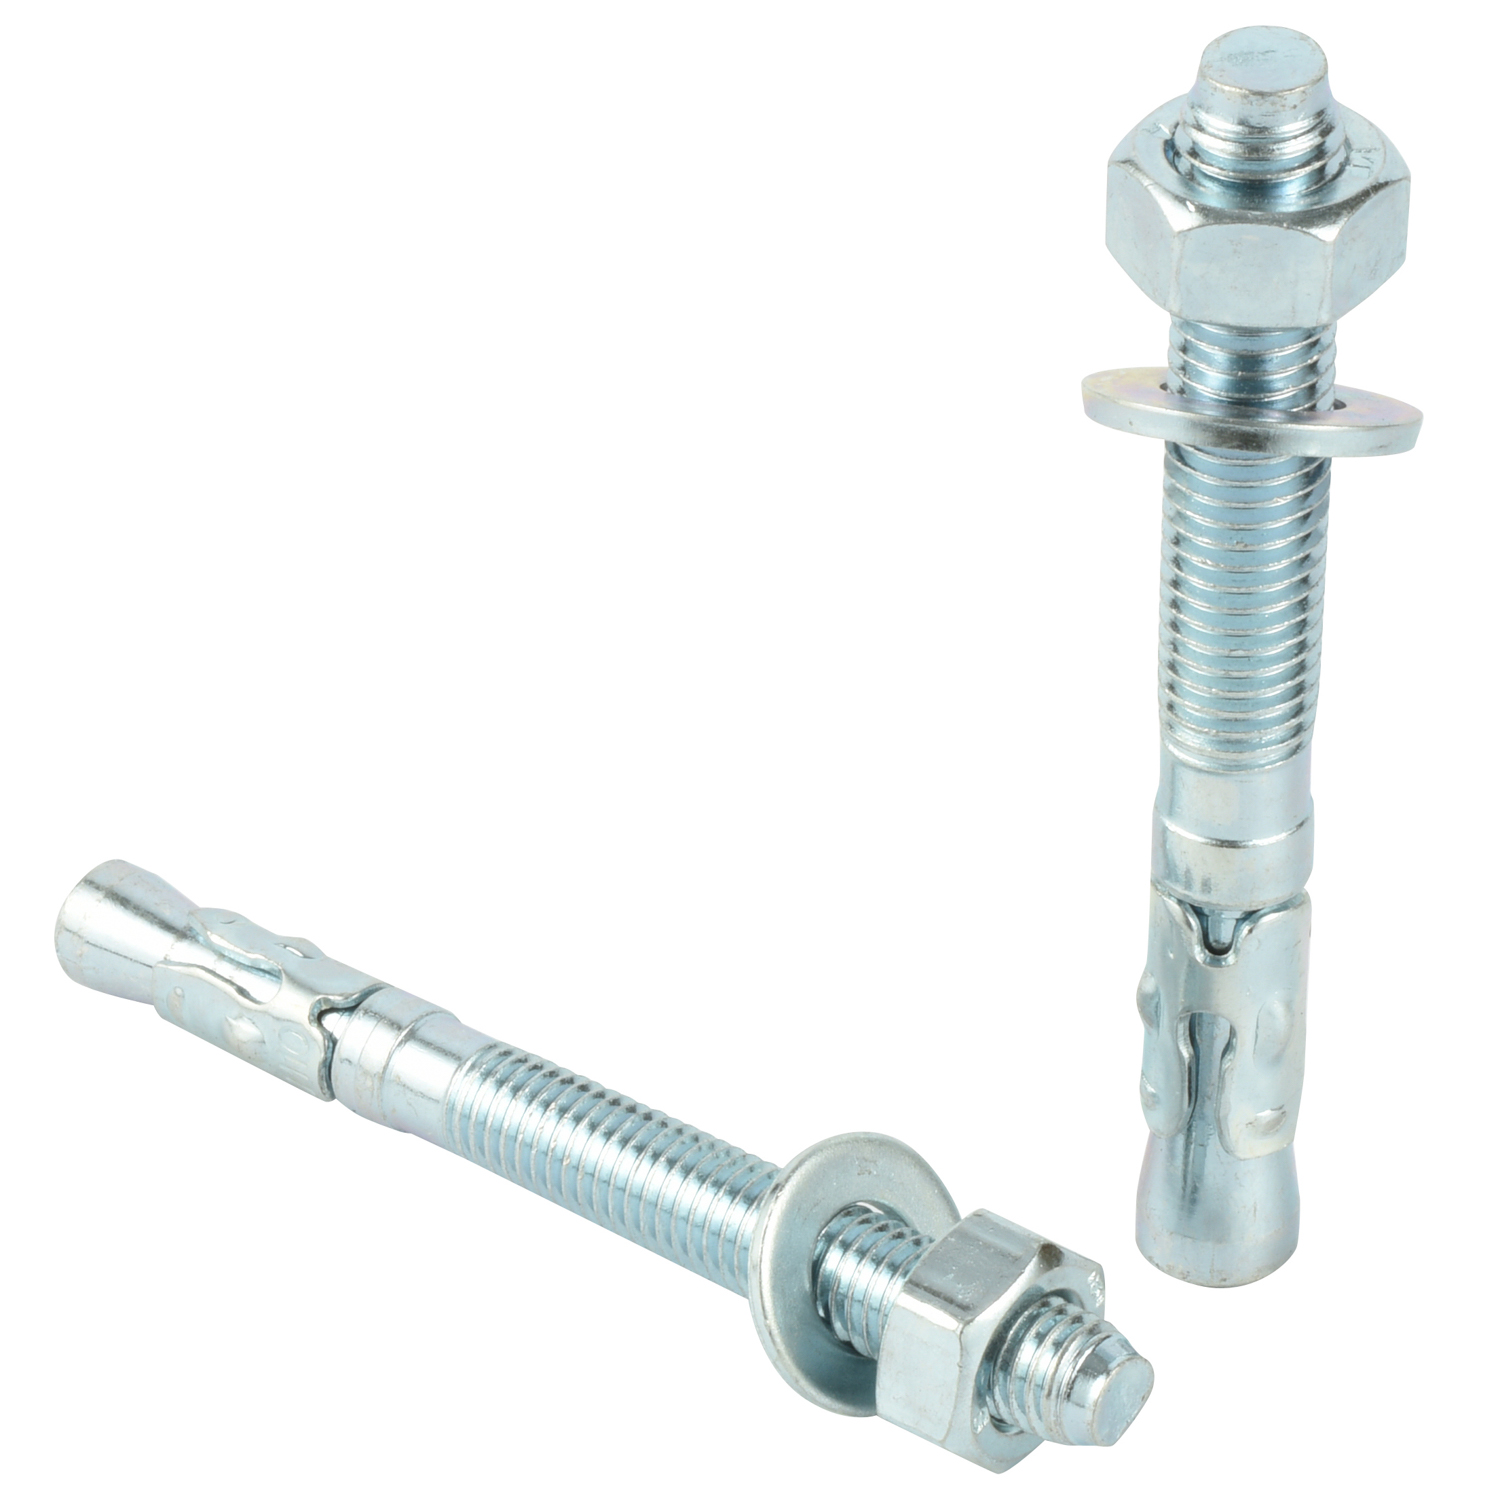
Securing heavy structural loads requires uncompromising hardware. You simply cannot rely on standard masonry screws when dealing with immense shear and tension forces. A wedge anchor serves as a heavy-duty, permanent fastener engineered exclusively for solid concrete applications. Unfortunately, improper installation practices remain surprisingly common across construction sites.
Errors like incorrect sizing, poor hole preparation, and over-torquing drastically reduce holding power. These mistakes create genuine safety hazards. They risk catastrophic fixture failure under heavy loads. A failed anchor compromises the entire structural assembly.
This guide provides an objective, structurally sound standard operating procedure for installing these critical fasteners. You will discover exactly how to select, install, and evaluate heavy-duty anchors for your next project. We outline the strict commercial and residential protocols needed to ensure absolute structural integrity.
Wedge anchors are exclusively for solid concrete—never use them in brick, hollow block, or mortar.
The drill bit diameter must precisely match the wedge anchor diameter.
Thoroughly cleaning concrete dust from the drilled hole is mandatory to achieve listed holding values.
Applying the manufacturer-specified torque is required to safely expand the anchor without compromising the bolt.
Preparation determines the ultimate success of your fastening application. You must verify the base material and calculate precise load requirements before drilling begins. A properly specified wedge anchor guarantees long-term performance.
You must confirm the substrate is fully cured, solid concrete. Freshly poured concrete lacks the internal compressive strength required to hold expansion clips securely. Industry standards dictate a minimum 28-day curing period before installation. Never attempt to place these heavy-duty fasteners into hollow block, brick, or mortar joints. Those materials will crack under outward expansion force.
Selecting the correct anchor length prevents shallow embedment failures. The fastener must reach deep into the concrete core while leaving enough thread exposed above the fixture. Use this standard formula to calculate your minimum required length:
Formula: Minimum Embedment Depth + Fixture Thickness + Space for Nut and Washer = Minimum Anchor Length.
For example, if you need a 2-inch embedment depth to secure a 1-inch thick steel base plate, and you need 1 inch of extra thread for the nut and washer, you must purchase a fastener measuring at least 4 inches long.
Selecting the right alloy prevents premature corrosion and structural failure. Environmental factors dictate your material choice.
Material Type | Best Operating Environment | Typical Applications |
|---|---|---|
Zinc-Plated Carbon Steel | Dry, indoor environments | Warehouse racking, indoor handrails |
Hot-Dipped Galvanized (HDG) | Moist, outdoor environments | Exterior signage, treated lumber sills |
Type 304/316 Stainless Steel | Corrosive, submerged, or chemical areas | Marine environments, chemical plants |
You must reference the manufacturer's Technical Data Sheet (TDS). These documents detail ultimate tension (pull-out force) and shear (downward force) loads. These values depend entirely on the concrete's compressive strength, measured in PSI. A standard commercial floor often rates at 3000 PSI. Always apply a standard 4:1 safety factor. Divide the ultimate load listed in the TDS by four to determine your safe working load limit.
Professional installation demands professional-grade equipment. Using makeshift tools leads to oversized holes, damaged threads, and failed inspections. Gather these specific tools before beginning your project.
You need an SDS rotary hammer drill for this job. Do not use standard hammer drills for large diameters. Standard hammer drills lack the striking energy needed to penetrate hard aggregate efficiently. They often create wobbly, out-of-round holes. An SDS rotary hammer delivers precise, piston-driven blows.
Your drill bit dictates the success of the entire installation. You must use an ANSI-standard carbide-tipped masonry drill bit. The bit diameter must match the fastener diameter perfectly. If you install a 1/2-inch fastener, you use a 1/2-inch ANSI bit. ANSI standards ensure strict manufacturing tolerances. Using non-compliant or worn bits creates undersized or oversized holes.
Dust removal is not optional. You will need a heavy-duty wire brush, a blow-out bulb, or a compressed air vacuum system. The brush loosens compacted dust from the side walls. The air system evacuates the debris completely.
Use a standard heavy hammer or a mallet to drive the fastener into the hole. To secure it, you absolutely need a calibrated torque wrench. A standard wrench or an impact driver cannot measure foot-pounds accurately. A torque wrench avoids dangerous under-torquing or over-torquing.
Concrete drilling produces hazardous silica dust. OSHA compliance requires strict safety protocols. Wear ANSI-approved safety goggles to protect against flying aggregate chips. Use heavy-duty hearing protection to block the rotary hammer noise. Finally, wear an appropriate N95 or P100 dust mask to prevent silica inhalation.
Strict adherence to a standardized operating procedure prevents common failures. Following these four steps ensures the expansion clip engages the concrete matrix perfectly. This maximizes structural holding power.
Proper hole geometry determines the fastener's gripping capability. You must drill deep enough to accommodate the embedment depth plus extra space for loose debris.
Depth Rule: Drill a minimum of 1/2 inch deeper than the expected embedment depth. This extra space prevents the fastener from bottoming out prematurely. Even after cleaning, some aggregate dust will fall back into the hole during insertion. The extra half-inch acts as a safe debris trap.
Angle: Ensure the drill remains perfectly perpendicular to the concrete surface. Maintain a strict 90-degree angle. Crooked holes cause the wedge anchor to bind against the fixture plate. This binding creates uneven stress points and false torque readings.
Skipping this step is the most common reason for installation failure. A dirty hole compromises friction.
Risk Mitigation: Remaining concrete dust acts as a highly effective dry lubricant. If you leave dust inside, it coats the expansion clip. This lubrication severely reduces friction and drastically lowers ultimate pull-out strength.
Action: Professionals employ the "blow-brush-blow" method. First, use a vacuum or blow-out bulb to remove loose dust. Next, plunge a wire brush into the hole several times to scrub the side walls. Finally, blow it out a second time to remove the newly loosened particles. Ensure the hole is visually clear of gray powder.
You must prepare the hardware before striking it. Direct hammer impacts will destroy exposed steel threads.
Preparation: Thread the nut onto the top of the stud. Stop when the nut is exactly flush with the top of the threads. This setup protects the delicate thread profile from aggressive hammer strikes. It ensures you can tighten or remove the nut later.
Insertion: Push the assembled fastener through the fixture hole and into the clean concrete hole. Strike the top of the flush nut squarely with your hammer. Continue driving it downward until the washer sits securely against the fixture plate.
Torquing is the final and most critical mechanical step. The torque draws the stud upward, forcing the expansion clip outward against the concrete walls.
Setting the Wedge: Grab your calibrated torque wrench. Tighten the nut to the exact foot-pounds specified by the manufacturer's technical data sheet. The required torque varies significantly based on the fastener's diameter.
Warning: Overtightening represents a massive safety risk. It can cause the entire stud to spin in the hole, or it can physically shear the steel threads. Conversely, undertightening prevents the expansion clip from gripping the concrete base. Always trust the calibrated wrench.
Contractors frequently debate between expansion hardware and concrete screws. Each system utilizes entirely different mechanical principles. Understanding these differences helps you select the correct hardware for your specific load profile.
Expansion fasteners handle significantly higher shear and tension loads than standard concrete screws. Their thick steel body and aggressive expansion collar bite deeply into hard aggregate. This makes them ideal for structural steel plates, heavy warehouse machinery, and pallet racking systems. Concrete screws work best for medium-duty loads.
Concrete screws offer excellent versatility across different substrates. You can install them in solid concrete, hollow cinder block, brick, and mortar joints. The screw cuts its own threads into the base material without exerting massive outward pressure. Expansion fasteners cannot do this. You must use them exclusively in solid concrete to prevent substrate blowouts.
Temporary installations favor concrete screws. You simply reverse your drill and back the screw out. Expansion fasteners are permanent fixtures. Once the expansion collar engages, it embeds itself permanently into the concrete walls. If you must remove the fixture later, you can only take off the nut and washer. You must then cut the steel stud flush with an angle grinder. Alternatively, if you drilled the hole deep enough initially, you can pound the stud entirely beneath the concrete surface.
Because expansion fasteners exert tremendous outward force, they require significant distance from concrete edges. This outward pressure creates a "stress cone" inside the concrete. If you install them too close to a slab edge, the pressure will blow out the side of the concrete. This phenomenon is called spalling. Concrete screws exert minimal outward force, allowing you to install them much closer to edges.
Even experienced installers encounter unpredictable job site conditions. Recognizing the signs of an impending failure allows you to correct the issue before applying a heavy load.
Using a bit that is worn down prevents the fastener from entering the hole. Worn carbide tips lose their gauge quickly. Conversely, using the wrong standard—such as substituting a metric bit for an ANSI bit—creates a hole that is slightly too large. When the hole is too large, the expansion clip cannot find enough friction to engage. The entire assembly will simply slide out under tension. Always inspect your bit for wear before starting a new project.
Installing multiple fasteners too close together creates overlapping stress cones. When concrete takes a heavy load, the force radiates outward and upward in a cone shape. If these invisible cones overlap, you drastically reduce the holding power of both fasteners. The concrete between them will shatter. Minimum spacing is typically 10 anchor diameters apart. Minimum edge distance is usually 5 anchor diameters from an unsupported concrete edge.
Sometimes the entire stud spins freely when you attempt to apply torque. This indicates a total failure of the expansion mechanism. Spinning occurs if the hole is too large, the concrete is unexpectedly soft, or the hole was not properly cleaned. Dust prevents the clip from grabbing the wall. Remedy this by stopping immediately. You cannot save a spinning fastener. You must relocate the fixture plate slightly and redrill a fresh, properly sized hole.
A secure installation relies entirely on precise preparation and strict procedural execution. Your success depends on precise drilling, rigorous hole cleaning, and correct torque application. Skipping any of these steps compromises structural safety and risks catastrophic failure.
Before beginning your next installation, review your project's specific engineering specifications. Calculate your required tension and shear load capacities carefully. Finally, consult a reputable fastener catalog to select the appropriately sized and correctly coated hardware for your specific environmental conditions.
A: No, they are permanent. You can remove the nut and fixture, and either cut the stud flush with an angle grinder or hammer it below the concrete surface (if drilled deep enough initially).
A: It depends on the diameter. Manufacturers specify a "minimum embedment depth" (often roughly 4 to 5 times the diameter of the anchor) to achieve safe holding values.
A: Usually caused by an oversized hole (worn drill bit), failing to clean the concrete dust, or hitting a void/soft spot in the concrete.