 English
Author: Site Editor Publish Time: 2026-06-11 Origin: Site


Securing heavy structural elements, industrial racking, or heavy machinery demands serious reliability. You need a fastener capable of resisting immense static loads. It must also withstand sudden shear forces without yielding. The industry standard for heavy-duty, permanent fastening in solid concrete is the wedge anchor. Selecting the wrong fastener type carries severe consequences. Misjudging your base materials or botching the installation process also creates immediate risks. These mistakes routinely lead to catastrophic pull-out failures. They create dangerous safety hazards and cause costly project delays.
This comprehensive guide explains the precise mechanical principles behind these vital fasteners. You will learn how to accurately evaluate if they suit your specific project requirements. We also cover crucial sizing guidelines and material selection criteria. Finally, we detail expert installation best practices. By following these steps, you ensure absolute structural integrity for every fixture you mount.
Mechanism: A wedge anchor utilizes torque-controlled expansion; tightening the nut pulls a cone-shaped stud into an expansion clip, wedging it permanently against the concrete walls.
Base Material Limitation: Designed strictly for solid concrete. They will fail if used in hollow block, brick, or mortar joints.
Sizing: The required drill bit size is exactly the same as the anchor diameter, minimizing guesswork.
Permanence: Once installed and torqued, a wedge anchor cannot be removed without cutting the stud or core-drilling the concrete.
Understanding how a fastener works helps you avoid critical installation errors. These heavy-duty fasteners do not rely on chemical adhesives. Instead, they utilize purely mechanical physics. They generate massive holding power through torque-controlled expansion.
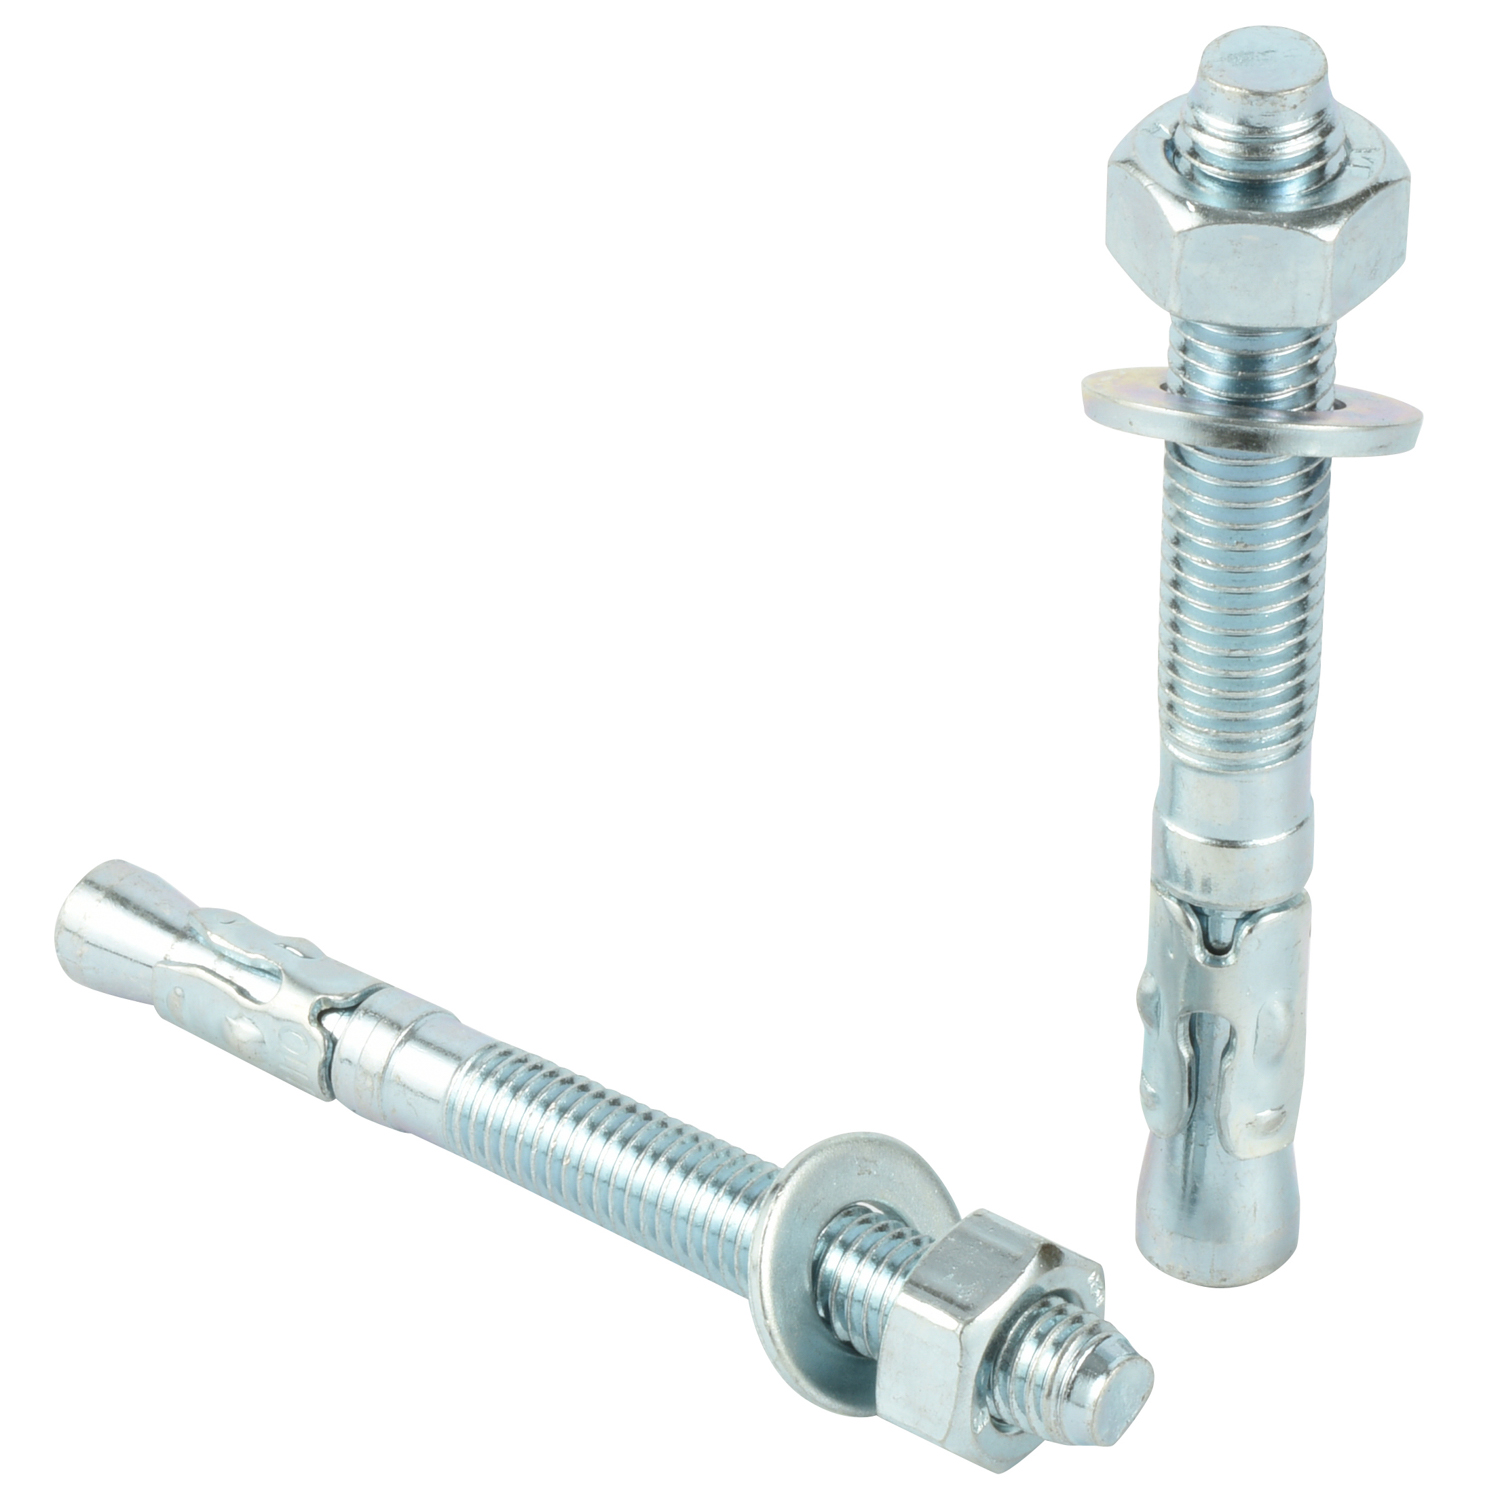
Every standard wedge anchor consists of four primary components. Each part plays a specific role in securing the load.
Threaded Steel Body: The main shaft features standard threads at the top. The bottom working end tapers into a distinct cone shape.
Expansion Clip: A free-spinning metal collar sits just above the tapered cone. It often features small bumps or stamped grip points.
Hex Nut: The nut threads onto the top of the body. You tighten it to activate the expansion mechanism.
Washer: A standard flat washer sits below the nut. It distributes the clamping force evenly across the fixture baseplate.
The mechanical action happens completely out of sight inside the concrete. Here is exactly what occurs when you install one.
First, you drive the anchor into a properly pre-drilled hole. The fit should feel exceptionally tight.
Next, you place your fixture over the protruding threads. You add the washer and begin tightening the hex nut.
As you apply torque to the nut, the threaded stud pulls upward. The fixture bracket prevents the nut from moving down.
This upward movement forces the tapered cone at the bottom directly into the expansion clip.
The metal clip cannot move upward. The cone forces it to expand outward aggressively.
The expanding metal bites into the microscopic pores of the concrete walls. This creates immense, friction-based holding power.
The entire system relies on friction. If the concrete is too soft, the clip will carve a channel and pull out. If the hole is too large, the clip cannot reach the walls to create friction.
Selecting the right fastener is a critical decision-stage process. You must align your specific project requirements with the correct anchor type. Making the wrong choice compromises safety. Below, we compare the top concrete fastening solutions.
Fastener Type | Base Material Compatibility | Load Capacity | Removability | Best Application |
|---|---|---|---|---|
Wedge Anchor | Solid concrete only | Very High | Permanent | Structural steel, heavy machinery |
Concrete Screws | Concrete, brick, block | Medium | Fully Removable | Light fixtures, wood-to-concrete |
Sleeve Anchors | Concrete, brick, block, mortar | Medium to High | Permanent | Hollow masonry, door frames |
Drop-In Anchors | Solid concrete only | High | Flush (Bolt is removable) | Overhead strut channels, ceiling grids |
Concrete screws feature hardened cutting threads. They tap their own mating threads directly into the base material. They offer distinct advantages for lighter loads. You can place them closer to concrete edges without causing blowouts. They are also entirely removable. However, they lack the sheer strength of expansion fasteners. For heavy structural steel or dynamic machine vibrations, you need the massive friction hold of an expansion clip.
Sleeve anchors look somewhat similar but function differently. A sleeve covers the entire length of the threaded stud. When tightened, the sleeve expands along its entire length. This makes them incredibly versatile. You can use them safely in hollow brick, cinder block, or mortar joints. However, for solid concrete applications, they simply cannot match the supreme load capacity of a dedicated wedge anchor.
Drop-in anchors sit entirely flush with the concrete surface. They feature internal female threads. You install them using a setting tool, then thread a separate bolt into them. They excel in overhead installations. They also allow you to remove the bolt later while leaving the base flush. Conversely, an expansion stud always remains protruding from the concrete. You use them when bolting heavy baseplates down to a floor.
You must short-list the correct SKU before purchasing. Sizing mistakes will ruin an installation. Material failures will lead to severe rust and eventual structural collapse. Follow these exact guidelines to choose the right specifications.
Guessing the length leads to dangerous under-embedment. You must calculate the required length mathematically. Use this simple formula:
Minimum Embedment Depth: Check the manufacturer's technical data sheet for this number.
Fixture Thickness: Measure the exact thickness of the steel plate or wood beam you are mounting.
Nut and Washer Allowance: Add the thickness of the nut and the washer. Usually, adding the diameter of the anchor covers this.
For example, you want to install a 1/2-inch diameter stud. The manufacturer requires a 2-1/4 inch minimum embedment. Your steel bracket is 1/2 inch thick. You need roughly 1/2 inch for the nut and washer. Adding these together equals 3-1/4 inches. You must purchase a length of at least 3-1/4 inches.
Heavier loads strictly require wider diameters. Common sizes range from 1/4 inch up to 1-1/4 inches. A larger diameter provides greater tensile and shear strength. However, larger diameters introduce new challenges.
Wider fasteners require much deeper holes. They also require greater spacing between multiple anchors. You must keep them further away from unsupported concrete edges. The massive expansion force of a 3/4-inch stud will easily crack the concrete if placed too close to a ledge. Always consult engineering charts to verify spacing rules for your chosen diameter.
Concrete wicks moisture. Your environment dictates your material choice. Selecting the wrong coating guarantees rapid corrosion.
Zinc-Plated Carbon Steel: This is the standard choice. It suits dry, indoor applications only. It offers minimal rust protection.
Hot-Dipped Galvanized: This coating features a thick, dull layer of zinc. It survives humid indoor environments. It also handles mild outdoor exposure well.
304/316 Stainless Steel: This represents the highest tier of corrosion resistance. It carries the highest cost but poses the lowest risk of failure. You must specify stainless steel for marine settings, high-corrosion environments, or any chemical exposure.
Operational best practices prevent pull-out failures. You must execute each installation step perfectly. A quality fastener cannot compensate for poor workmanship. Follow these expert steps strictly.
Always use a heavy-duty rotary hammer drill. Standard hammer drills lack the necessary impact energy for larger diameters. The carbide-tipped masonry bit must match the anchor diameter precisely. If you install a 5/8-inch stud, you must use exactly a 5/8-inch drill bit.
You must drill the hole deeper than your intended embedment depth. Drill at least 1/2 inch past the required depth. This extra space provides a cavity for any loose concrete dust that falls to the bottom.
Skipping this step is the most common cause of failure. Concrete dust acts as a highly effective lubricant. It coats the walls of the hole. When the clip expands, it slides against this dust instead of biting into the concrete.
You must blow the hole out completely using compressed air. Next, scrub the interior walls with a wire brush. Finally, blow it out with compressed air a second time. The interior walls must remain perfectly clean to generate friction.
Before grabbing your hammer, thread the nut onto the stud. Thread it down until the top of the nut sits perfectly flush with the top of the steel body. This critical step protects the delicate threads from hammer strikes.
Drive the assembled unit through the fixture baseplate and into the hole. Use a minimum 2 lb. heavy hammer. You should feel significant resistance. Stop hammering once the washer sits tightly against your fixture.
Never guess the final tightness. Relying on "feel" creates dangerous inconsistencies across a job site. You must use a calibrated torque wrench. Check the packaging for the precise torque values.
Under-torquing prevents the clip from fully expanding. The fixture will shift under a heavy load. Over-torquing creates equally severe problems. It can snap the steel stud entirely. Worse, extreme pressure can crush the concrete inside the hole. This destroys the friction hold and causes the anchor to spin uselessly.
Even experienced installers face challenges on the job site. Concrete contains unpredictable elements. Knowing how to troubleshoot these problems keeps your project moving safely.
Solid concrete relies on embedded steel rebar for tensile strength. Your drill bit will eventually hit a rebar grid. You will feel the drill suddenly stop progressing. The drill motor will pitch higher. Do not force standard masonry bits through steel. You will destroy the carbide tip immediately.
You have two mitigation options. First, you can abandon the hole. Fill it with high-strength epoxy patch, and relocate your fixture slightly. Second, if the structural engineer permits it, you can switch to a specialized rebar-cutting drill bit. Cut cleanly through the steel, remove the shavings, and resume drilling with your masonry bit.
A "spinner" occurs when you turn the nut, but the entire stud rotates inside the hole. The clip never catches the walls. This incredibly frustrating scenario usually results from two specific mistakes.
Most often, the installer used an oversized hole. A severely worn-out drill bit can also wobble, reaming the hole wider than intended. Alternatively, the installer may have applied too much torque, crushing the surrounding concrete. Once a spinner happens, you cannot fix it. You must cut the stud off flush and drill a new hole nearby.
Placing heavy-duty fasteners too close to an unsupported edge invites disaster. When you torque the nut, the massive outward expansion force searches for the weakest point. If the edge is too close, the concrete will simply spall, crack, or blow out entirely.
Always follow the standard rule of thumb to prevent edge blowouts. Keep the fastener a distance of at least 5 to 10 times the anchor diameter away from any edge. For a 1/2-inch diameter stud, you must stay at least 2.5 to 5 inches away from the ledge. Check your specific manufacturer data for exact clearance requirements.
The wedge anchor remains the ultimate engineering choice for permanent, heavy-duty applications in solid concrete.
They generate massive friction through torque-controlled expansion, providing unmatched shear and tensile strength.
Holding power relies entirely on three strict factors: using solid base materials, executing precise hole cleaning, and adhering to manufacturer torque specifications.
Avoid common pitfalls by measuring embedment accurately, calculating edge distance, and matching drill bit sizes perfectly.
Next steps: Calculate your specific load and embedment requirements immediately. Then, consult a technical fastener catalog to source the proper material grade and size for your environment.
A: No. The expansion force will crack hollow block or brittle brick. Use sleeve anchors or toggle bolts instead.
A: They are permanent. To remove the obstruction, remove the nut, cut the stud flush with the concrete using an angle grinder, or pound the remaining stud deeper into the hole (if drilled deep enough initially).
A: No. Unlike other anchors, a 1/2" wedge anchor requires exactly a 1/2" masonry drill bit. The anchor diameter matches the hole diameter.
A: No. Once the clip expands and yields to the concrete, it cannot be reset or safely reused in a new hole.